December 16, 2023
July 13, 2023
Learn SolidWorks SheetMetal Tutorials: How to Create SheetMetal Models
Hai friends, welocme to solidworks video tutorials for beginners. It helps to learn solidworks cad software sheetmetal feature which explains various tools used to create sheetmetal models for beginners.
Let us see each feature video tutorials here.
Let us see each feature video tutorials here.
1. How to Create SheetMetal Base Flange
2. How to Create SheetMetal Edge Flange
March 21, 2020
How to Setup Windows 10 Sound Settings Tutorial for Beginners
Welcome to Windows 10 Tutorials for beginners and today, you
are going to learn how to use Windows 10 Sound settings effectively. Sound of
computer is very important and you can control it from the sound settings of
windows settings. For working of Windows 10 speakers, it needs Soundcard and
sound driver installed in your computer. You will Sound driver from the Windows
10 Updates.
Here, you can learn how to choose your output audio device,
Audio device properties, How to adjust volume, Input sound device (Microphone)
& its properties and Other App volume and device preferences.
Let us learn
Windows 10 audio settings one by one.
What is Windows 10 Sound Settings?
It is main sound control station of Windows 10 OS, which
helps to select output and input devices, controlling of sound devices and its
properties. It have another ability to control the Windows apps volume
individually as per requirements too.
Windows Sound contains System sounds, apps sounds and main master
volume. The master volume controls the all Windows 10 sounds output and input
devices. But to adjust system sounds and apps sounds, you have do it
separately.
For getting Windows sound, your computers should needed
Windows soundcard and audio driver. The combination of these two items helps to
give output as sound. You get it from Windows store or will get automatically
while updating your Windows 10.
How to Decrease or Increase Volume Windows 10 | Windows 10 Sound Settings Tutorial 1
For increasing or decreasing the volume Windows 10 is very
simple to do it. It can directly access it from right corner side of windows
taskbar. Click on the sound icon and decrease or increase volume by using your
mouse or left/right arrow buttons in your keyboard.

Or
You can go to Windows 10 Startmenu and click on the
“Settings app”.
From the appearing dialogue box, click on the “System tab”.
Then, you can see the Windows 10 system settings.
Click on the “Sound settings” from the sidebar and you will
see the windows 10 audio settings here.

You can see the sound control
like as seen earlier from the taskbar.
Or
Via Taskbar
You can go to the windows 10
taskbar and right click on the sound icon on it to see the sound menu.
From that, select the “Open
Sound Settings” and you will directly access to the Windows 10 audio settings
interface.
How to Choose Output Audio Device | Windows 10 Sound Settings Tutorial 2
This is feature helps to
choose output audio devices as Windows speakers or S/PDIF (Sony/Philips Digital
Interface). S/PDIF helps to coinnect with various consumer audio output devices
like 5.1 surround spearker system.
First connect your consumer
audio output to S/PDIF audio port.

By default, windows 10
spearkers selected here. Click on the down arrow to select required audio device.

How to Connect Microphone to Windows 10 | Windows 10 Sound Settings Tutorial 3
Microphone is an input device
which helps to record sound using it. Here, you will learn to connect
microphone to your computer.
First, connect mic or
microphone to audio port.

Then, go to Input section in
Windows sound settings and choose the input device.

Test your Microphone
You can test microphone by
making sound on it. Youi will see the sound level meter blinking on it.
Note: if you experince any
problems, clcik on “Troubleshoot” button and give solution for it.
How to Adjust System Sound and App Sound | Windows 10 Sound Settings Tutorial 4
Using Windows Sound Settings Tab
In the “Sound Settings tab”,
click on the “App volume and device preferences” under the Other Sound Options.

Now, you can see the “App
volume and device prefernces” dialogue box.
Here, you see the master
volume, system sound and app sound.
For changing the system
sound, increase or decrease the system sound meter using mouse or your
right/left arrow in keyboard.
You have do the same thing on
adjusting app sound too. Th apps sound is only applicable when an app is opened
condtion.
Using Windows Taskbar

Go to windows 10 taskbar and
use right mouse button to openthe sound menu from sound icon. And click on the
“open sound mixer” to access the sound mixer. Here you can change the system
sound and required app sound too.

Windows 10 Speaker Properties | Windows 10 Sound Settings Tutorial 5
How to access Speaker
Properties

To access the speaker
properties, you have to go to the sound settings and click on the “device
properties”. It will open the “Speaker properties” dialogue box.
Here you can see 5 sub tabs
for the speaker properties dialogue box.
General

It contains the speakers
icon, controller information & their propeties, jack information and enable
or disbale device option. Here, you can change the speakers displayed icon by
using the change icon option also.
For disabling the currently
used speaker, just select “don’t use the device (disable)” by clicking on the down arrow.
Levels

It is audio level of the
speaker system and increse by dragging the button right or to left for
decrease.
Click on the “Balance” option
to control the left side and right side speakers sound sepeartely.
Enhancements
You have certain enhancemenst
or audio effects imporving features available in here. You can use it any of
these to apply to your speakers system. The enhnacemenst provided are bass
boost, Virtual surround, room correction and loudness equliazation. You can
enable it by giving tick on their side box.
If you messed up with any
settings, don’t worry about it. And click on “Restore Defaults” button to reset
to default windows settings.
Advanced

Here, you can select the
sample rate and bit depth whilke running in the shared mode. Select quality of
audio format and use the “Test” button to test it with your speaker system.
Spatial Sound
This is new feature which
helps to select the Spatial sound format such as Windows sonic for headphones
and Dolby Atoms for headphones. You can also turn on 7.1 virtual surround sound
option to enahance the audio while using it with headphones. For setting up the
Dolby Atmos option, you need solid internet connection.
Windows 10 Sound Control Panel | Windows 10 Sound Settings Tutorial
Sound control panle is another
important part of Windows audio settings which controls the playback,
recording, System Sound scheme and Communications. Sound scheme is depends on
your windows theme and which enables new system and apps sound schemes.
Communication tab helps to minimize the system sound while making phone calls
or receving it via your PC.

How to Access Sound Control Panel
Using Windows taskbar

Use the right mouse button on
sound icon in the windows taskbar. From the appearing menu, select “Sound”
option and you can see the sound control panel.
Using Windows 10 Sound
Settings
Click on the “Sound control
panel” in the sound setting UI.
How to Configure Playback Speaker in Windows 10
From the Sound control panel,
clcik on the “playback tab”.

You can see list of enabled
audio devices in it. The audi device with side meter indicates its default
device and sound meter will vary while playing any music.
Then, click on the
“configure” option.
You can see the Speaker setup
dialogue box. Here you can select the Audio cahnnels as “stereo”. You can run a
test to checak on your current speaker system, by clicking on the “Test”
button.

Click on “Next” move to the
“Select full range speakers” box. Select the requoired speaker and sound of
each speaker can test by clicking on the speaker icon.
Again click “next” to
“finish” to complete speaker configuration.

How to Configure a Microphone for Sound Recording in Windows 10
In the sound control panel,
clcik on the “recording tab” to see the enabled microphone list.

Click on the “Configure”
button and it direct to “Speech Recogontion” dialogue box in Windows 10 control
panel.
Select “setup microphone”
option and dircet to Microphone setup wizard.

You can see 3 microphone
options; Heaset microphone, Desktop microphone and other microphones.
Here, I am using the Philips headset
microphone and select it and click on “Next”.

It direct to page with proper
placement and set up your headset microphone. Click “Next” button.

Next page you can see
sentence which is shown in the above image. Just read it slowly. Make sure your
voice level should reach the green colored indication for getting proper
microphone sound setup.
After reading it, click on
“Next” button.

If you read it by the above
requirements the configuraing of microphone is finshed. Click on “finish”
button.
Otherwise, it will show that
your microphone is Muted. Please check your microphone sound.
I hope you could understand
how to use Windows 10 sound settings for adjsuting sound, connceting S/PDIF and
microphone, configure speakers system and microphone.
March 20, 2020
How to Change Screen Resolution Windows 10
Welcome to Windows 10 tutorials for beginners and today, you
are going to learn to change screen resolution Windows 10. Screen resolution is
an important factor which helps to control the quality of display settings and
screen size. Here, you can see step by step windows 10 tutorial for changing
resolution of the windows 10 screen using both windows 10 display setting and
from context menu.


Let us see step by step tutorial to change screen resolution
Windows 10.
What is Screen Resolution?
Screen resolution is related display settings and it helps
to get clarity to letters, text, videos or pictures displayed in a screen. It
is measured in pixels. Higher the resolution means it have more clarity and
high pixel ratio. For lower resolution means, display have lower pixel ratio
and low quality display.
How to Change Screen Resolution Windows 10 using Settings App
Step 1

Click on Windows 10 StartMenu and select Windows 10 Settings
app from it.
Step 2

Select the “System” tab from the settings UI. It opens with
system settings dialogue box.


Select “Display” from the sidebar and you can see the
display option here. You can see the “Resolution” under the Scale and Layout
heading.

Click on the down arrow button to see various screen
resolution pixel measures. It varies from 1366 x 768 pixels (high screen
resolution) to 800 x 600 pixels (low screen resolution).
Select required screen resolution as per your need. Then a
quick dialogue box will appear like ass shown below.


Click on the “Keep changes”. If you want cancel the
selection “Revert”. This is one of the way to change screen resolution windows
10.
How to Change Screen Resolution Windows 10 using Context menu
There is another method to change screen resolution Windows
10, it is using Context menu from Desktop.
Go to Desktop and click right mouse button in the empty
space of desktop. From the appearing Drop-down menu, select “Display Settings”.

It is directing the same Display settings app as shown
above. You can change screen resolution Windows 10 by following the same step.
I hope you could get the idea for change screen resolution
Windows 10 using Settings app and context menu. By changing the screen
resolution, you are changing the csreen size, app icon size and text size too.
If you are reducing the screen resolution, you will get lower quality display,
which will improve your computer performance.
If you are plan to Upgrade to Windows 10 Professional ($143
at Amazon), please follow this amazon affiliate link to buy it. It will help us
to earn commission and income to maintain this website. Thank you friends.
Misleanenous Windows 10 Display Settings Tutorials
How to Change Screen Brightness in Windows 10

In the system tab, you can see the “brightness and color”
heading. In the “change brightness”
section, you have click and hold button using mouse pointer and drag left or
right to adjust the brightness.
You can also use the keyboard left and right arrow button
after selecting on the button to adjust the bright ness in windows 10.
How to Enable Night Mode in Windows 10

In the system tab, you see the “Night mode” under the
“display settings” section. Normally it would be in “Off” condition. Click on
it to “Turn on” to enable the Night mode feature in Win10. It would be very
helpful will reading PDF or books in your PC.

You can go to “Night light settings” to adjust the color
temperature, schedule night mode for turning on automatically and immediate
activation of Night light mode.
This is all you have to know in the Windows 10 display
settings. If you have any doubts feel free to ask and also need help in new
Windows 10 tutorials. You can contact through the contact box or comment box.
March 19, 2020
Windows 10 System Settings User Interface Explained
Welcome to Windows 10 tutorials for beginners and in this
post you are going to see about Windows 10 system settings. It is sub tab of
Windows 10 settings app which contains system related settings like display,
sound, storage, power, notification control, battery, tablet mode, remote
desktop and multitasking. In this windows 10 Tutorial post you are going to see
each of the system tab options in Windows 10 settings app.


Let us get familiar each System tab features user interface
and their functions in your computer.
What is Windows 10 System Settings?

It is complete ability of your computer system which capable
and also gets control over them. Here you can meet several system features like
display, battery, storage and other options. It also give your system
information (about system) in your Windows 10 PC. Mainly system settings are
used to control over the main system features. Here, you can see each system
tab features in detail.
Display System Settings
Display is one of the main part of computer. It helps to
display actions and see the things that you are doing in the PC. So, It should
pleasing to eye for effective working and productivity to the users. The
display system settings helps you to make adjust brightness of display,
Resolution of your screen, Scaling of text, detection of multiple displays,
Graphics settings and advanced display settings. It also contains Night mode
option, which controls the brightness and color of screen in the night.

You can schedule the time for enabling the night mode. It
would be more helpful for using Windows 10 tablet or pc as book reading.
Sound System Settings

Sound system tab is helps to get control over the system
sounds, select output and input sound devices, adjust sound level (both output
and input), app volume control individually, direct access to sound device
properties and Trouble shoot options.
Notifications & Actions System Tab

It controls the notifications of several apps and
notification bar area. You can arrange or edit the quick actions buttons in the
notification bar using this system tab. It helps to control the notifications
on lock screen, Notifications from apps and senders and Reminders about VoIP
calls on the lock screen.
Power & Sleep System Settings

Power and sleep are the one of the important system settings
which helps to manage the power of your battery. You can setup the screen turn
off and sleep time of your pc in battery on and plugged in conditions
(charging). If you forgot to do turn off pc, these settings will automatically
do the rest in an inactive computer.
Battery System Windows Settings

Battery charge control is need of Windows 10 laptop pc or
Tablet. Like in your smartphone, there is cool feature “battery saver” which
can setup it here. It also indicate the battery life of your computer. There is
another feature which helps to analyze the consumption of battery in your
system. From that, you will get to know which windows apps consume more power
than others.
Storage System Windows Settings

It shows the local storage drives and also give information
of types of files stored in these drives. The storage sense feature helps to
free up the space by deleting the temporary files and cleaning up the recycle
bin. It also helps to manage storage space and change where new content is
used.
Tablet Mode Settings
To select tablet or desktop mode, you can setup here in
Tablet mode system Windows settings. You can also hide apps icons or hide
taskbar in tablet model. Here, you can turn on or off it according to mode you
selected.
MultiTasking System Settings

Here, you can see the setting of Virtual desktops and also
snap settings.
Remote Desktop Settings

Remote desktop system feature enables to connect PC remotely
through remote desktop client app. You can access your Windows 10 PC directly
from other device. Here, I am using the windows 10 home edition, so it doesn’t
support for me. You need to Upgrade Windows 10 edition from home to
Professional.
This is all about the Windows 10 System settings app user
interface. It explains each of the sub tabs in system settings. You will see
very detailed Windows 10 tutorial for each tab sections.
Feel free to share your thoughts and opinions as comments.
Thank you friends.
March 18, 2020
How to Set Windows 10 Default Programs
Welcome to Windows 10 Tutorials for beginners and in this
how to tutorial, you are going to learn how to set Windows 10 default programs
in your Win 10 PC. For opening each file types, you should require help of
software program or app (modern tech called short form for applications). When
opening a file type (say, Mp3 format), it will ask you to play it in Windows
media player or Groove music app in Windows 10. This is happening due to lack of
default programs settings in your Windows 10 Operating system.
Here, you are going to learn to set default apps in Windows
10 in four methods. It is very easy to set default apps on Windows.
They are:-
- Choose Default Programs by Apps
- Choose Default Programs by File type
- Choose Default programs by File Protocol
Watch and Learn to Set Windows 10 Default Apps here:-
Common Steps for Set Windows 10 Default Apps
First, Go to “Start” button and select “Windows 10 Settings”
from it.
Then, you will see the Settings user interface and click on
“Apps” on it.

Now, you can see Apps dialogue box and select “default apps”
from the side bar which is shown below.

You can see the default apps which is set by Windows 10 operating
system itself. Common Windows 10 default programs section are Email, Video
Player, Music Player, Maps, Photo viewer and web browser.
How to Set Windows 10 Default Programs by Apps | Method 1
For changing the default apps, click on the app displayed.
Here, you are going see an example for setting Microsoft
edge browser as default web browser.
Currently my default web browser program is Google chrome
which is shown in the image below.
Click on the Google Chrome app. Then you can see a pop-up
window and select listed web browser from it.
Select “Microsoft Edge” as default web browser app and its
done. You could also change other default apps in the same way.
Note:-
You can also look for new browsers by clicking on the “Look
for an app in the store”. You need internet connection for download new windows
10 apps from the Windows store.
How to Set Windows 10 Default Programs by File Type | Method 2
Click on the “Choose Default Apps by File Type” and wait for
the page to load with File types.

Here you can associate file types with specific apps. All
file types which are contained in your windows 10 system will show here. You
can assign each software by clicking on the app.
To associate new file types, just click on the “+” sign for
“Choose a Default”.
Click on “Look for an app in Windows store” to search the
appropriate windows apps for particular file type. For accessing Windows 10
Store, you need to connect your computer with Wi-Fi or Internet.
You will direct to store and search app here and install
suitable app for your selected file type.
This way you can associate windows 10 default apps using the
File Type.
How to Set Windows 10 default Programs by Protocol | Method 3
This is 3rd method to set Windows 10 default apps
by protocol of specific apps. For that, click on “choose default apps by
protocol” and wait for page to load.

You can see the default associate protocols with specific
apps done by Windows 10. For changing default one, you need to click on the app
and change with suitable one or find from windows store just like the above
methods.
How to Set Windows 10 Default Programs using Windows Context Menu | Method 4
You can also set it from the windows 10 context menu. An
example showing below.
Select and MP4 file and right click on it. Then you can see
windows 10 context menu.

Select “Open with” and a side drop down menu will appear and
click on “choose another app” from it.

A dialogue box will appear and ask for “How do you want to
open this file”.
Select the needed app and tick on the “Always use this app
to open .mp4 files” and click “Ok” and Default Windows 10 app for videos or any
file can be set like this.
How To Reset Windows 10 Default Apps
To reset default apps and click on the “reset” button which
shown in the figure below.

All the Default programs will reset to factory state.
Miscellaneous Information’s:-
What is Default Applications?
This is app or program which is set as default and when some
use double click and file will open in that program. For example, you set .MP4
video file format open with KM player. When you double clicks on the files with
“.MP4” format, it will open only with KMplayer. This is called default
applications. For setting, you need to access the windows settings and set
default applications as per your requirement.
March 17, 2020
Windows 10 Settings User Interface Explained for Beginners
Welcome to windows 10 tutorials to all beginners and intermediate
users. This is the 11th post of windows 10 tutorial, explains about
the new windows 10 setting user interfaces. It also include tutorial of how to
access setting option and each options applications are also explained in this
tutorials post.
Windows 10 Settings
Do you know the ControlPanel of windows 7/8/8.1? Windows 10setting UI is also same as the controlpanel in the previous operating systems
of windows, but not full options of controlpanel are involved. It is trusted
windows store app which will get to your computer, via windows 10 update
installation. Control panel is desktop app which is still their having full
power of system security and apps control (uninstall).

Windows 10 setting is really useful in terms of quick
accessing of different options in one UI. That means, you access every option
inside the setting like browsing on the web. Each options are clearly arranged
and abilities of each one are mentioned nicely.
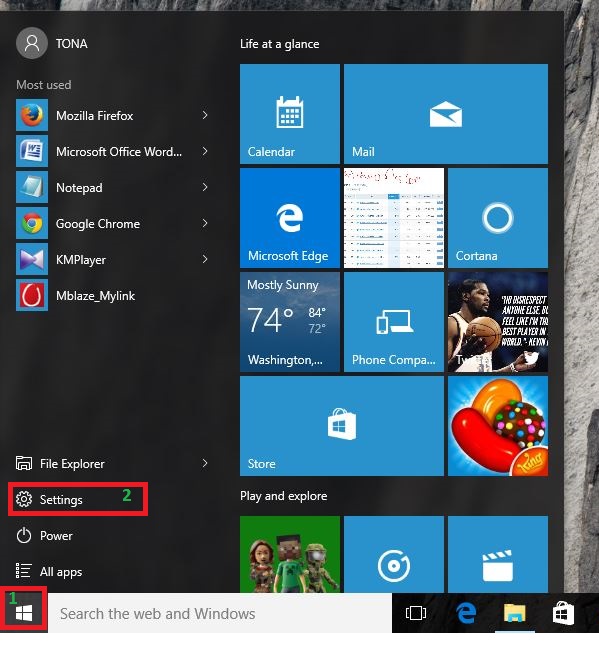
How to Access Windows 10 Settings UI
Using Start Menu
Click on startmenu and select The “Settings” from it, which
shown below.

Using My Computer or This PC
You can find the “This PC” icon (which is computer pictured
icon); double click on it and it will open the This PC user interface, from
that click on the “Open Settings”.
What is inside Settings?
The windows 10 settings app contained several options like
System, Devices, Personalization, Accounts, Time and Languages, Internet and
Network, Ease of access, privacy, update and security. Here I will only share
the what are the uses of these settings options. On later posts, I will explain
each one of the options tutorials in the Windows 10 Tutorials for beginners
series.
Windows 10 Settings: System
The “System” is the first option in the settings which
mainly controls the display settings of your pc, notifications setup, power
management, storage, apps and features controls etc. You can also enable the
multitasking and tablet modes from the system settings.
Windows 10 Settings: Devices
Devices settings are completely related to the connected
devices, Bluetooth and media control settings. Here you can control the
connected devices via device manager, also setup the printers and scanners etc.
Bluetooth option also access from these UI and pairing jobs are easily done
with it.
Windows 10 Settings: Network & Internet
Network and internet option contains all related with
internet and network control like Wi-Fi, Ethernet, Data usage, VPN, Dial-UP and
proxy. Airplane mode is also activated from this UI.
Windows 10 Settings: Personalization
The personalization settings is a desktop customization
option, in which you can change background wallpapers, colors, Windows 10
themes, lock screen pictures etc.
Windows 10 Settings: Accounts
For all the windows OS, you can make different user account,
if your computer is shared with others also. Accounts option will help to do
that and also helps to change the profile pictures, password, and full control
of the other user accounts, if you are the administrator.
Windows 10 Settings: Time & Language
Here you setup the time of your desktop or laptop, language
as you need with your PC and speech setup also. Speech setting is always
depends on the type of language as you set in the language section.
Windows 10 Settings: Ease of Access
Windows 10 also provide cool settings called “Ease of
access”. In this, I like the narrator setting, which reads the text whatever in
your onboard. While internet browsing, sometimes I feel little tired of
reading. But the narrator option helps me to read the things, only I need to
hear it. Other options are also included such as Magnifier, High contrast
templates, caption display setup, mouse pointer setup, keyboard keys settings
and visual options.
Windows 10 Settings: Privacy
Privacy is one of the main options which allow users to hide
their information from others. That means, without user permission, third
parties can’t access it. Windows 10 is also having several apps like abdroid
phones. Here you can control the apps access of different parts of your PC such
as camera, microphone, messaging, photos, music, etc. You can also control the
background apps running which are important in terms of internet data
consumption and performance of your PC with windows 10 OS.
Windows 10 Settings: Update & Security
According to this OS, update is an important feature,
because Microsoft will not going to release new version of windows ( as per
announcements) , only provide the latest update via windows 10 update settings.
Security feature of windows 10 is Windows defender which defends you system
against malicious softwares and virus attack, if you don’t have additional
antivirus tools. It also provide backup, recovery and developer options.
These are the main options contain the windows 10 settings
app. It is also connected with your specific settings. This app only helps to
access these settings with ease and your windows apps are controlled by this
app. In the later posts, each one of the options tutorials is explained in very
detail.
Feel free to share your honest opinions about this how to
tutorial post and thank you friends.


